Bottom Sheets の実装方法
マテリアルデザインにおけるコンポーネントのひとつに、ボトムシート (Bottom Sheets) があります。
「ボトムシートはスクリーンの下の縁からスライドアップして、追加のコンテンツを表示する要素である」 と定義されています。
2016年2月にリリースされた Android Design Support Library 23.2 では、ボトムシートの実装がサポートされました。
CoordinatorLayout の子ビューにボトムシートビヘイビア (BottomSheetBehavior) を追加できます。
ここでは、BottomSheetBehavior の簡単な実装例を紹介します。
Android Design Support Library 23.2 を利用した Bottom Sheets の実装例
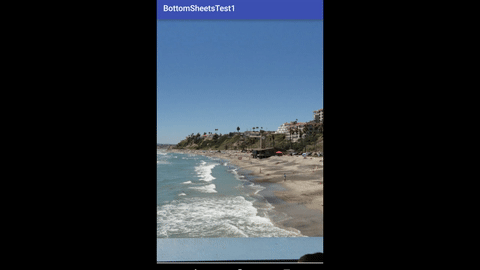
ここでは次のように、画像をタップすると下側からボトムシートが表示されて、追加の情報 (この例ではビーチの名前) が表示される例を考えます。
さっそく実装を見てみましょう。
レイアウトリソース res/layout/activity_main.xml は次の通りです。
<?xml version="1.0" encoding="utf-8"?>
<android.support.design.widget.CoordinatorLayout
    xmlns:android="http://schemas.android.com/apk/res/android"
    xmlns:tools="http://schemas.android.com/tools"
    xmlns:app="http://schemas.android.com/apk/res-auto"
    android:layout_width="match_parent"
    android:layout_height="match_parent">
    <ImageView
        android:id="@+id/imageView1"
        android:src="@drawable/beach"
        android:layout_width="match_parent"
        android:layout_height="match_parent"
        android:scaleType="centerCrop"
        android:minHeight="200dp"
        android:text="Hello World!" />
    <LinearLayout
        android:id="@+id/bottomSheet1"
        android:layout_width="match_parent"
        android:layout_height="200dp"
        android:background="#E0E0E0"
        android:padding="16dp"
        app:layout_behavior="@string/bottom_sheet_behavior">
        <TextView
            android:id="@+id/textView1"
            android:layout_width="match_parent"
            android:layout_height="match_parent"
            android:text="San Clemente Beach"
            android:textSize="32sp"/>
    </LinearLayout>
</android.support.design.widget.CoordinatorLayout>
CoordinatorLayout がルート要素となっており、そこに ImageView で画像を表示。 さらにボトムシートとして振る舞う LinearLayout があり、その中に文字を表示するための TextView が含まれています。
ポイントはボトムシートになる View の layout_behavior 属性に android.support.design.widget.BottomSheetBehavior を指定します。 尚、これはライブラリ内の string リソースの @string/bottom_sheet_behavior という名前が付けられています。
このボトムシートが画像のタップによって表示されるようにするため、次のコードを記述します。
package com.keicode.android.test2.bottomsheetstest1;

import android.support.design.widget.BottomSheetBehavior;
import android.support.v7.app.AppCompatActivity;
import android.os.Bundle;
import android.view.View;
import android.widget.ImageView;

public class MainActivity extends AppCompatActivity
        implements View.OnClickListener {

    BottomSheetBehavior mBottomSheetBehavior;

    @Override
    protected void onCreate(Bundle savedInstanceState) {
        super.onCreate(savedInstanceState);
        setContentView(R.layout.activity_main);

        View view = findViewById(R.id.bottomSheet1);
        ImageView imageView = (ImageView) findViewById(R.id.imageView1);
        imageView.setOnClickListener(this);

        mBottomSheetBehavior = BottomSheetBehavior.from(view);
    }

    @Override
    public void onClick(View v) {
        switch(v.getId()){
            case R.id.imageView1:
                if( mBottomSheetBehavior.getState() == BottomSheetBehavior.STATE_EXPANDED ) {
                    mBottomSheetBehavior.setState(BottomSheetBehavior.STATE_COLLAPSED);
                }
                else {
                    mBottomSheetBehavior.setState(BottomSheetBehavior.STATE_EXPANDED);
                }
                break;
        }
    }
}
上記のように BottomSheetBehavior.from メソッドを用いて、ボトムシートとなる View から BottomSheetBehavior を作成。
イベントリスナーにてそれの状態を setState メソッドで設定します。BottomSheetBehavior.STATE_EXPANDED をセットすれば、 ボトムシートが表示され、BottomSheetBehavior.STATE_COLLAPSED をセットすれば非表示になります。