Notification.Builder によるステータス通知の作成
以前の記事「ステータス通知」では簡単なステータス通知を行なう方法を紹介しました。
ステータス通知というのは、ステータスバーに通知を表示するものですね。
それ以外の通知はトースト通知というので、短時間一度画面にメッセージを表示するものですね。
その後、Notification を作成する方法が変わりました。
Notification.Builder による Notification の作成
具体例は次の通りです。ポイントは前述の通り Notification.Builder を用いて Notification を作成している箇所です。
package com.example.notificationtest1;

import android.app.Activity;
import android.app.Notification;
import android.app.NotificationManager;
import android.app.PendingIntent;
import android.content.Context;
import android.content.Intent;
import android.net.Uri;
import android.os.Bundle;
import android.view.View;
import android.view.View.OnClickListener;
import android.widget.Button;

public class MainActivity extends Activity
  implements OnClickListener {

  Button button1;

  @Override
  protected void onCreate(Bundle savedInstanceState) {
    super.onCreate(savedInstanceState);
    setContentView(R.layout.activity_main);

    button1 = (Button)findViewById(R.id.button1);
    button1.setOnClickListener(this);
  }

  @Override
  public void onClick(View v) {
    switch(v.getId()){
    case R.id.button1:
      showNotification();
      break;
    }

  }

  public void showNotification(){
    Intent i = new Intent(android.content.Intent.ACTION_VIEW);
    i.setData(Uri.parse("http://www.google.com/"));

    PendingIntent pendingIntent
      = PendingIntent.getActivity(
        this,
        0,
        i,
        0);

    Notification notification = new Notification.Builder(this)
      .setContentTitle("Title!")
      .setContentText("Content Text!")
      .setContentIntent(pendingIntent)
      .setSmallIcon(R.drawable.ic_launcher)
      .setAutoCancel(true)
      .build();

    NotificationManager nm = (NotificationManager)
      getSystemService(Context.NOTIFICATION_SERVICE);

    nm.notify(1000, notification);
  }

}
もし API レベル 4 等をサポートする必要がある場合は、サポートライブラリの NotificationCompat.Builder を利用します。
また次のように Action を追加することもできます。
Notification notification = new Notification.Builder(this)
  .setContentTitle("Title!")
  .setContentText("Content Text!")
  .addAction(R.drawable.ic_launcher, "Google!", pendingIntent)
  .setContentIntent(pendingIntent)
  .setSmallIcon(R.drawable.ic_launcher)
  .setAutoCancel(true)
  .build();
この場合は次のようになります。
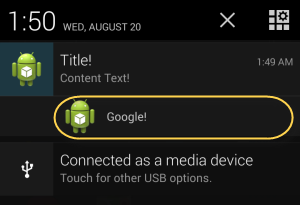
上図内でマークした箇所は、選択すると addAction で指定したインテントが有効です。