"Loading" メッセージを表示する ProgressDialog の使い方
ウェブサイトなどでは、データのロードなどの時間のかかるところでは "Loading..." とか "読み込み中..." などのメッセージを表示する場合が多いですよね。
特に Ajax っぽい動きをするときには、ほぼ必ずといっていいほどです。
ちょっと脱線ですが昔、 Web 2.0 が到来!などと言われていたころは, 「Web2.0 とは 『Beta』 と 『Loading...』 を表示することだ」 なんて冗談を言う人もいました。
Loading... を表示する動機
 たとえ普段は時間はかからない処理でも,ネットワーク越しの問い合わせなどは、通信状況によってはどうしても時間のかかる場合もあります。
そういう箇所はメインスレッド (GUI スレッド) からその処理を切り離し,"Loading..." を出しつつバックエンドで処理をした方が無難と言えます。
たとえ普段は時間はかからない処理でも,ネットワーク越しの問い合わせなどは、通信状況によってはどうしても時間のかかる場合もあります。
そういう箇所はメインスレッド (GUI スレッド) からその処理を切り離し,"Loading..." を出しつつバックエンドで処理をした方が無難と言えます。
Android では "Loading" を出すのに都合の良い、 ProgressDialog が用意されています。
ここでは ProgressDialog の使い方をみていきます。
尚、画面でメッセージを出しつつ裏で作業をするために非同期処理が必要です。 ExecutorService やタスクが良く分からない,というかたは 「非同期処理の基礎」 を先にみておくと良いでしょう。
またサンプルプログラムでは ListView とカスタムのアダプターを利用しています。少し実践的になるように、という気持ちからですが、これは必須ではありませんのであしからず・・・。
ProgressDialog の使い方
ProgressDialog の使い方は実は非常に簡単です。 show で表示して、 dismiss で消せば OK です。
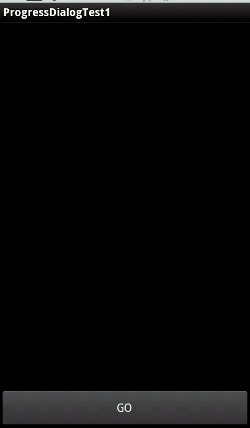
ここで作るサンプルプログラムは次のような動きをします。
画面の上部に ListView、下部に Button が配置されています。ListView にはアイテムが無いので空っぽのままです。
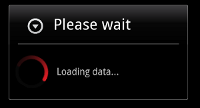
ボタンをタップすると、 "Loading..." というメッセージが表示されます。これが ProgressDialog によって表示されています。
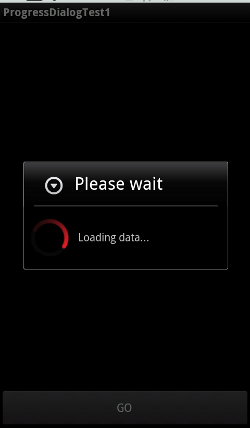
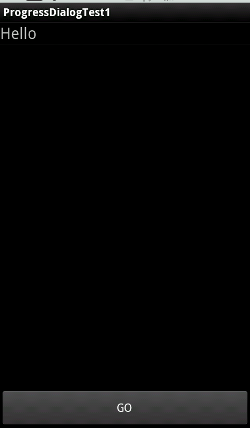
少し時間が経つと裏側の ListView に項目が追加されてダイアログが閉じます。
レイアウト - メインと ListView の行
まずはメインのアクティビティのビューのレイアウトはこちらです。 res/layout/main.xml です。
<?xml version="1.0" encoding="utf-8"?>
<LinearLayout
  xmlns:android="http://schemas.android.com/apk/res/android"
  android:orientation="vertical"
  android:layout_width="fill_parent"
  android:layout_height="fill_parent"
  >
  <ListView
    android:id="@+id/listView1"
    android:layout_height="wrap_content"
    android:layout_width="match_parent"
    android:layout_weight="1"/>
  <Button
    android:text="GO"
    android:id="@+id/go_button"
    android:layout_height="wrap_content"
    android:layout_width="match_parent"/>
</LinearLayout>
ListView の行毎のレイアウトはこちらです。 これは res/layout/row.xml に書きました。
<?xml version="1.0" encoding="utf-8"?>
<LinearLayout
  xmlns:android="http://schemas.android.com/apk/res/android">
  <TextView
    android:id="@+id/row_textview1"
    android:layout_width="wrap_content"
    android:layout_height="wrap_content"
    android:textSize="20sp"/>
</LinearLayout>
今回の例ではわざわざカスタムのビューを作ってますが、文字列を表示するだけなら android.R.layout.simple_list_item_1 でももちろん構いません。
尚、ListView のカスタマイズについては ListView の行のカスタマイズ をみてください。
非同期で行うタスクは次のとおりです。 ここでは単に 5秒間スリープして、最後に hideProgressDialog という自前で定義したメソッドを呼んでいます。
package com.keicode.android.test;

public class MyTask implements Runnable {

  ProgressDialogTest1 dialogTest1;

  public MyTask(ProgressDialogTest1 dialogTest1){
    this.dialogTest1 = dialogTest1;
  }

  @Override
  public void run() {
    try {
      Thread.sleep(5 * 1000);
      dialogTest1.hideProgressDialog();
    } catch (InterruptedException e) {
      e.printStackTrace();
    }
  }

}
メインの処理は次の通りです。
package com.keicode.android.test;

import java.util.ArrayList;
import java.util.List;
import java.util.concurrent.ExecutorService;
import java.util.concurrent.Executors;

import android.app.Activity;
import android.app.ProgressDialog;
import android.content.Context;
import android.os.Bundle;
import android.os.Handler;
import android.view.LayoutInflater;
import android.view.View;
import android.view.ViewGroup;
import android.view.View.OnClickListener;
import android.widget.BaseAdapter;
import android.widget.Button;
import android.widget.ListView;
import android.widget.TextView;


public class ProgressDialogTest1 extends Activity
    implements OnClickListener {

  static final String TAG = "ProgressDialogTest";

  static List<String> items = new ArrayList<String>();
  static ItemAdapter adapter;

  ListView listView;
  Button goButton;
  ProgressDialog progressDialog = null;

  ExecutorService execService;
  Handler guiThreadHandler;

  @Override
  public void onCreate(Bundle savedInstanceState) {
    super.onCreate(savedInstanceState);

    setContentView(R.layout.main);
    findViews();

    goButton.setOnClickListener(this);
    adapter = new ItemAdapter();
    listView.setAdapter(adapter);

    initThreading();
  }


  @Override
  public void onClick(View v) {
    switch(v.getId()){
    case R.id.go_button:
      test();
      break;
    }
  }


  protected void findViews(){
    listView = (ListView)findViewById(R.id.listView1);
    goButton = (Button)findViewById(R.id.go_button);
  }


  protected void initThreading(){
    execService = Executors.newSingleThreadExecutor();
    guiThreadHandler = new Handler();
  }


  public void hideProgressDialog(){
    guiThreadHandler.post(new Runnable(){
      @Override
      public void run() {
        // Test Data
        items.add("Hello");
        adapter.notifyDataSetChanged();

        if(progressDialog!=null){
          progressDialog.dismiss();
          progressDialog = null;
        }
      }
    });
  }


  protected void startAsyncTask() {

    // Show ProgressDialog
    progressDialog = ProgressDialog.show(
      ProgressDialogTest1.this,
      "Please wait",
      "Loading data...");

    // Post AsyncTask
    MyTask task = new MyTask(ProgressDialogTest1.this);
    execService.submit(task);

  }


  protected void test(){
    startAsyncTask();
  }


  ///////////////////////////////////////////////////////
  //
  // Adapter
  //


  private class ItemAdapter extends BaseAdapter {

    @Override
    public int getCount() {
      return items.size();
    }

    @Override
    public Object getItem(int pos) {
      return items.get(pos);
    }

    @Override
    public long getItemId(int pos) {
      return pos;
    }

    @Override
    public View getView(
      int pos,
      View convertView,
      ViewGroup parent) {

      View v = convertView;
      TextView itemTextView;

      if(v == null){
        LayoutInflater inflater = (LayoutInflater)
          getSystemService(Context.LAYOUT_INFLATER_SERVICE);
        v = inflater.inflate(R.layout.row, null);
      }

      String item = items.get(pos);

      if(item != null){
        itemTextView = (TextView)
          v.findViewById(R.id.row_textview1);
        itemTextView.setText(item);
      }

      return v;
    }
  }
}
基本的な枠組みは 「非同期処理の基本的な枠組み」 で紹介した枠組みになっていますが、 少し簡略化しています。
ProgressDialog がモーダル (画面の裏が操作できない) で表示しているので、複数回の非同期処理の開始は起こらないことを想定できます。 したがって、以前は非同期処理の開始は postDelayed メソッドを用いてメインスレッドへタスクをポストすることによって行っていましたが、 直接 ExecutorService への submit で非同期処理を開始しています。
hideProgressDialog ではメインスレッドへタスクをポストしています。
dismiss の呼び出しはどのスレッドから呼んでも構わないようですが、 オブジェクト items と adapter は保護していないので、 メインスレッドからのみアクセスするようにするためです。