アクションバーのタブ・ナビゲーション
以前はタブ形式のナビゲーションは TabHost と TabWidget を用いて実装されました。
タブホストとタブウィジェットを用いた実装については、タブを使ったレイアウト ~ TabHost と TabWidget をみてください。
しかしながら、アクションバーが導入されてからは、アクションバーのタブナビゲーションを利用することが推奨されています。
アクションバーのタブナビゲーションを利用することによって、タブナビゲーションに十分な幅が無い場合、自動的にタブが非表示になり、 アクションアイテム(ボタン)として表示されるようになるなど、より多くのスクリーンサイズに対応可能となります。
このため新しいアプリケーションでは、アクションバーを活用すべきです。
この資料ではアクションバーの "タブナビゲーションモード" の基本的な利用方法について説明します。
アクションバーのタブナビゲーション
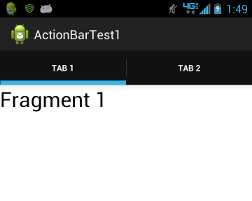
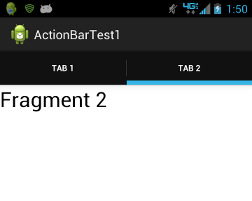
アクションバーのタブ・ナビゲーションを利用すると、次のような UI となります。
ここではタブ "TAB 1" に "Fragment 1" と、タブ "TAB 2" に "Fragment 2" という文字を表示しています。
TabHost と TabWidget を利用した実装では、土台となるアクティビティが TabActivity から派生したクラスとなり、そこで取得できる TabHost に対して、Tab 1, Tab 2 となるアクティビティを追加しました。
アクションバーの実装では、アクションバーのナビゲーションモードを ActionBar.NAVIGATION_MODE_TABS として、 アクションバーにタブを追加します。タブの中身はフラグメントとします。
#フラグメントについては「フラグメント」をみてください。
従って、ここではタブを二個作るので、メインアクティビティとフラグメント2個を実装します。
レイアウトファイル
レイアウトは次の通り。次を res/layout/activity_main.xml とします。
<FrameLayout
    xmlns:android="http://schemas.android.com/apk/res/android"
    xmlns:tools="http://schemas.android.com/tools"
    android:id="@+id/container"
    android:layout_width="match_parent"
    android:layout_height="match_parent"/>
次の内容を res/layout/fragment1.xml とします。単に TextView を使って文字を書いているだけです。
<?xml version="1.0" encoding="utf-8"?>
<LinearLayout
  xmlns:android="http://schemas.android.com/apk/res/android"
  android:orientation="vertical"
  android:layout_width="match_parent"
  android:layout_height="match_parent"
  android:background="#ffffff">
  <TextView
    android:layout_width="wrap_content"
    android:layout_height="wrap_content"
    android:textSize="30sp"
    android:textColor="#000000"
    android:text="Fragment 1"/>
</LinearLayout>
次の内容を res/layout/fragment2.xml とします。
<?xml version="1.0" encoding="utf-8"?>
<LinearLayout
  xmlns:android="http://schemas.android.com/apk/res/android"
  android:orientation="vertical"
  android:layout_width="match_parent"
  android:layout_height="match_parent"
  android:background="#ffffff">
  <TextView
    android:layout_width="wrap_content"
    android:layout_height="wrap_content"
    android:textSize="30sp"
    android:textColor="#000000"
    android:text="Fragment 2"/>
</LinearLayout>
タブの中身となるフラグメント
タブの中身となるフラグメント 1 (Fragment1) とフラグメント 2 (Fragment2) はそれぞれ次の通りです。
どちらもビューをレイアウトファイルから作成しているだけです。
package com.example.actionbartest1;

import android.os.Bundle;
import android.app.Fragment;
import android.view.LayoutInflater;
import android.view.View;
import android.view.ViewGroup;

public class Fragment1 extends Fragment {

  @Override
  public View onCreateView(
    LayoutInflater inflater,
    ViewGroup container,
    Bundle savedInstanceState) {
    return inflater.inflate(R.layout.fragment1, container, false);
  }

}
Fragment2 は fragment2.xml を読み込みます。
package com.example.actionbartest1;

import android.os.Bundle;
import android.app.Fragment;
import android.view.LayoutInflater;
import android.view.View;
import android.view.ViewGroup;

public class Fragment2 extends Fragment {

  @Override
  public View onCreateView(
    LayoutInflater inflater,
    ViewGroup container,
    Bundle savedInstanceState) {
    return inflater.inflate(R.layout.fragment2, container, false);
  }

}
ウィジェットの状態の保存、元に戻すなどの操作は onSaveInstanceState とか onCreateView を使って行いますが、 これについては別の記事で書きたいと思います。
アクションバーとタブリスナーの設定
さて、やっとメインアクティビティの作成です。
ポイントは次の通りです。
- onCreate でタブのナビゲーションモードを設定。(ActionBar の setNavigationMode メソッドを呼ぶ)
- タブリスナー (TabListener) を作成
package com.example.actionbartest1;

import android.app.ActionBar;
import android.app.Activity;
import android.app.FragmentTransaction;
import android.app.ActionBar.Tab;
import android.app.ActionBar.TabListener;
import android.os.Bundle;
import android.app.Fragment;

public class MainActivity extends Activity {

  @Override
  protected void onCreate(Bundle savedInstanceState) {
    super.onCreate(savedInstanceState);
    setContentView(R.layout.activity_main);

    final ActionBar actionBar = getActionBar();
    actionBar.setNavigationMode(ActionBar.NAVIGATION_MODE_TABS);

    actionBar.addTab(actionBar
      .newTab()
      .setText("TAB 1")
      .setTabListener(
        new MainTabListener<Fragment1>(
          this,
          "f1",
          Fragment1.class
        )
      )
    );
    actionBar.addTab(actionBar
      .newTab()
      .setText("TAB 2")
      .setTabListener(
        new MainTabListener<Fragment2>(
          this,
          "f2",
          Fragment2.class
        )
      )
    );
    }

  public static class MainTabListener<T extends Fragment>
    implements TabListener {

    private Fragment fragment;
    private final Activity activity;
    private final String tag;
    private final Class<T> cls;

    public MainTabListener(
      Activity activity, String tag, Class<T> cls){
      this.activity = activity;
      this.tag = tag;
      this.cls = cls;
    }

    @Override
    public void onTabReselected(Tab tab, FragmentTransaction ft) {
    }

    @Override
    public void onTabSelected(Tab tab, FragmentTransaction ft) {
      if(fragment == null){
        fragment = Fragment.instantiate(activity, cls.getName());
        ft.add(android.R.id.content, fragment, tag);
      }
      else{
        ft.attach(fragment);
      }
    }

    @Override
    public void onTabUnselected(Tab tab, FragmentTransaction ft) {
      if(fragment != null){
        ft.detach(fragment);
      }
    }
    }
}
タブリスナーではタブの選択時、非選択時等の動作を定義します。
ここでフラグメントをインスタンス化して設定しています。