フラグメントの一番簡単な利用方法
ここではフラグメントの一番簡単な利用方法について説明します。
フラグメントは Android 3.0 以降のものであることに注意してください。
さて、何をもって一番簡単といっているのかというと、一つのアクティビティに静的に取り込んでいるからです。
後でみるように、ディスプレイの情報にしたがって動的にアクティビティを取り込む、取り込まないとするのもアクティビティの大きな利点の一つですが、 コードの再利用という観点からは静的に取り込むことにも大きな意味はあります。
フラグメントを静的に組み合わせる
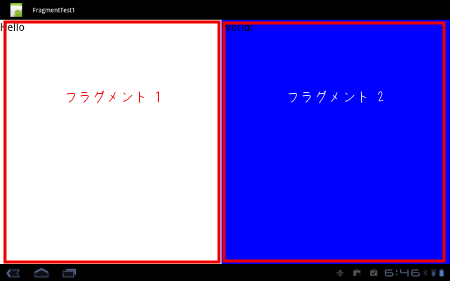
ここで作るプログラムは次のとおりです。
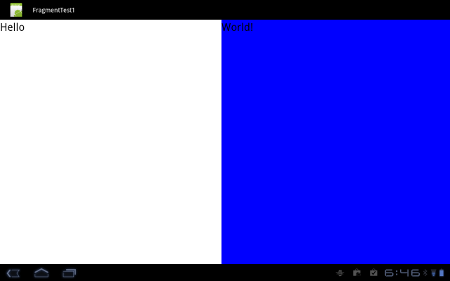
ランドスケープではつぎのように見え・・・
ポートレイトでは次のようになります。
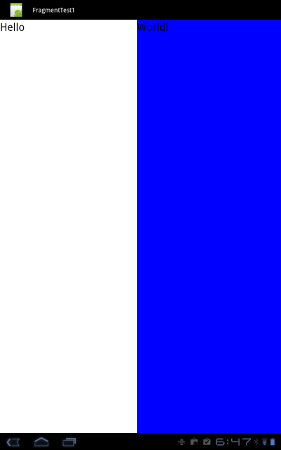
この時、白と青の部分がそれぞれ、フラグメントで構成されています。
フラグメントの作成
まずフラグメント1を作りましょう。
res/layout/fragment1.xml をつぎのように定義します。
<?xml version="1.0" encoding="utf-8"?>
<LinearLayout
	xmlns:android="http://schemas.android.com/apk/res/android"
	android:orientation="vertical"
	android:layout_width="match_parent"
	android:layout_height="match_parent"
	android:background="#ffffff">
	<TextView
		android:layout_width="wrap_content"
		android:layout_height="wrap_content"
		android:textSize="30sp"
		android:textColor="#000000"
		android:text="Hello"/>
</LinearLayout>
コードは次のように android.app.Fragment を派生して作ります。
package com.keicode.android.test;

import android.app.Fragment;
import android.os.Bundle;
import android.view.LayoutInflater;
import android.view.View;
import android.view.ViewGroup;

public class Fragment1 extends Fragment {

	@Override
	public View onCreateView(
		LayoutInflater inflater,
		ViewGroup container,
		Bundle savedInstanceState) {
		return inflater.inflate(R.layout.fragment1, container, false);
	}

}
LayoutInflater でビューを作っています。LayoutInflater はタブレット専用では無く、 LayoutInflater は ListView のカスタマイズなどでも扱いましたね。
同様にフラグメント2は次のように定義します。レイアウト res/layout/fragment2.xml は次のとおり・・・
<?xml version="1.0" encoding="utf-8"?>
<LinearLayout
	xmlns:android="http://schemas.android.com/apk/res/android"
	android:orientation="vertical"
	android:layout_width="match_parent"
	android:layout_height="match_parent"
	android:background="#0000ff">
	<TextView
		android:layout_width="wrap_content"
		android:layout_height="wrap_content"
		android:textSize="30sp"
		android:textColor="#000000"
		android:text="World!"/>
</LinearLayout>
コード Fragment2.java は・・・
package com.keicode.android.test;

import android.app.Fragment;
import android.os.Bundle;
import android.view.LayoutInflater;
import android.view.View;
import android.view.ViewGroup;

public class Fragment2 extends Fragment {
	@Override
	public View onCreateView(
		LayoutInflater inflater,
		ViewGroup container,
		Bundle savedInstanceState) {
		return inflater.inflate(
			R.layout.fragment2, container, false);
	}
}
さて、これでフラグメントができました。
今回は単純にフラグメント1、2にそれぞれ "Hello"、"World!" という文字を表示するだけです。
フラグメントを取り込むアクティビティの定義
それでは次に、上で作ったフラグメント1、2を取り込むアクティビティを定義します。
メインアクティビティは、Eclipse で Android プロジェクトを作ったときのままなので、割愛します。単純にコンテントビューとして、 メインのレイアウトリソース (res/layout/main.xml) を設定するだけです。問題はその main.xml です。
res/layout/main.xml は次のようにします。fragment 要素で上記 Fragment1, Fragment2 を取り込んでいるのが分かりますね。
<?xml version="1.0" encoding="utf-8"?>
<LinearLayout
	xmlns:android="http://schemas.android.com/apk/res/android"
	android:orientation="horizontal"
	android:layout_width="fill_parent"
	android:layout_height="fill_parent">
	<fragment
		android:name="com.keicode.android.test.Fragment1"
		android:id="@+id/fragment1"
		android:layout_width="wrap_content"
		android:layout_height="match_parent"
		android:layout_weight="1"
	/>
	<fragment
		android:name="com.keicode.android.test.Fragment2"
		android:id="@+id/fragment2"
		android:layout_width="wrap_content"
		android:layout_height="match_parent"
		android:layout_weight="1"
	/>
</LinearLayout>
これを Honeycomb タブレット(あるいは Android 3.0 以上のエミュレータ) で実行すると上記の画面になるはずです。