アプリケーション内でのロケール設定
Android には 「文字リソースのローカライゼーション」でみたように、 ロケール設定にしたがって適切なリソースを読む仕組みがあります。
しかしながら、時にはアプリケーション上で言語を切り替えるといった要求もあることでしょう。
予想だにしなかったことすらしばしば起きるのですから、予想されることなど起きて当然です(笑)
この記事では言語設定をシステムのロケール設定に頼らずに、アプリケーション上で設定する方法について説明します。
アプリケーションでの言語設定
ここで作るプログラムは次のようなものです。
"Japanese" と "English" というラベルのボタンを二つ用意します。
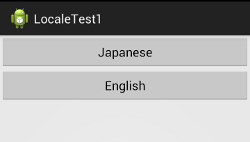
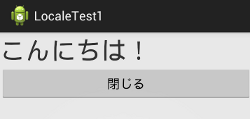
Japanese ボタンを押すと、日本語のリソースがロードされたアクティビティ (Activity2) が起動します。
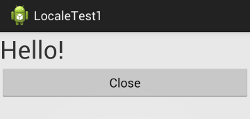
English ボタンを押すと、英語のリソースがロードされたアクティビティ (Activity2) が起動します。
同じアクティビティ (もちろんコードはひとつ) で、言語違いの画面が起動する、というわけです。
ではさっそく、実装方法をみてみましょう。
configChanges に "locale" を設定
android:configChanges にはそのアクティビティが扱う設定をリストします。ここでは locale を変更するので、 AndroidManifest.xml で MainActivity の configChanges を "locale" に設定します。
<?xml version="1.0" encoding="utf-8"?>
<manifest xmlns:android="http://schemas.android.com/apk/res/android"
	...
	<activity
		android:name="com.example.localetest1.MainActivity"
		android:label="@string/app_name"
		android:configChanges="locale">
		...
	</activity>
	<activity android:name="Activity2"></activity>
...
言語リソースの準備
res/values フォルダには次の strings.xml を配置します。
<?xml version="1.0" encoding="utf-8"?>
<resources>
	<string name="app_name">LocaleTest1</string>
	<string name="hello_world">Hello world!</string>
	<string name="menu_settings">Settings</string>
	<string name="japanese">Japanese</string>
	<string name="english">English</string>
	<string name="hello">Hello!</string>
	<string name="close">Close</string>
</resources>
res/values-ja フォルダには次の strings.xml を配置します。
<?xml version="1.0" encoding="utf-8"?>
<resources>
	<string name="app_name">ロケールテスト</string>
	<string name="hello_world">ハローワールド!</string>
	<string name="menu_settings">設定</string>
	<string name="japanese">日本語</string>
	<string name="english">英語</string>
	<string name="hello">こんにちは!</string>
	<string name="close">閉じる</string>
</resources>
この部分については、「文字リソースのローカライゼーション」も参考にしてください。
ロケールの設定
元の二つのボタンを持つ MainActivity は次の通りです。
ボタンのクリックリスナーとして MainActivity そのものを指定して、 クリックされた時にロケールを設定してから、アクティビティを開始しています。
package com.example.localetest1;

import java.util.Locale;

import android.os.Bundle;
import android.app.Activity;
import android.content.Intent;
import android.content.res.Configuration;
import android.view.View;
import android.view.View.OnClickListener;
import android.widget.Button;

public class MainActivity extends Activity
	implements OnClickListener {

	Button jpButton;
	Button enButton;

	@Override
	protected void onCreate(Bundle savedInstanceState) {
		super.onCreate(savedInstanceState);
		setContentView(R.layout.activity_main);
		findViews();
		initViews();
	}

	protected void findViews(){
		jpButton = (Button)findViewById(R.id.button1);
		enButton = (Button)findViewById(R.id.button2);
	}

	protected void initViews(){
		jpButton.setOnClickListener(this);
		enButton.setOnClickListener(this);
	}

	@Override
	public void onClick(View v) {
		if(v.getId()==R.id.button1){
			setLocale("ja");
		}
		else if(v.getId()==R.id.button2){
			setLocale("en");
		}
		startActivity(new Intent(this, Activity2.class));
	}

	void setLocale(String lang){
		Locale locale = new Locale(lang);
		Locale.setDefault(locale);
		Configuration config = new Configuration();
		config.locale = locale;
		getResources().updateConfiguration(config, null);
	}
}
ちなみに、コンフィギュレーションを更新した後、直ちにはそれを設定したアクティビティに反映しないことには、設計上注意が必要ですね。
つまり今回の場合、ボタンを押して日本語のロケールに設定した直後にそのボタンのラベルが日本語に切り替わるというわけではない、ということです。