ViewFlipper によるアニメーション付き画面切り替え
iPhone や Android などの新しいスマートフォンでは美しい UI も魅力の一つです。
クールなかっこいい印象を出すためには、画面を切り替えるときに、スイッチのオン・オフのように機械的に切り替わるのではなく、スライドしたり、ズームしたりという効果をいれた方が良い場合も少なくありません。
いわゆる トゥイーン・アニメーション (Tween Animation) というものです。これに対して映画のように画像を切り替えてみせるのはフレームアニメーション (Frame Animation) といいます。
ここでは Android がもつ ViewFlipper というウィジェットを利用して、画面のスライド・アニメーションを行う方法を示します。
ViewFlipper サンプルプログラムの動作
ここで作るアニメーションは次のようなものです。
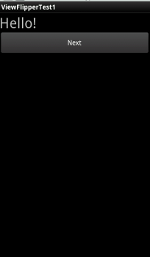
まず、"Hello!" という文字とボタンがひとつある画面があります。
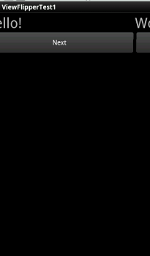
このボタンをクリックすると、アニメーションが始まり、今まで表示されていた画面が左側にスライドして消えていきます。と、同時に右側から新しい画面がスライドインしてきます。
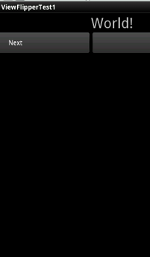
そして最終的に右側から入ってきた画面が全面に表示されます。
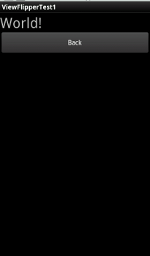
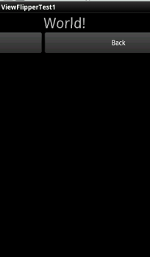
この状態からボタンを押すと、今度は左側から元の画面がスライドインしてきて、現在の画面が右側にスライドしていきます。
このようなアニメーション効果をどのように設定するのか、具体的なコード例をみていきます。
ViewFlipper のコード例
XML によるアニメーションとレイアウトの設定
Tween アニメーションは res/anim ディレクトリ内の XML ファイルで定義できます。コンパイル後は Animation オブジェクトとして扱えます。
res/anim/filename.xml とすると、プログラムからは R.anim.filename としてアクセスできます。
具体例として以下の効果を設定します。
left_in.xml
500ms かけて左側からスライドして入ってきます。
<?xml version="1.0" encoding="utf-8"?>
<set
  xmlns:android="http://schemas.android.com/apk/res/android">
  <translate
    android:fromXDelta="-100%p"
    android:toXDelta="0"
    android:duration="500"/>
</set>
left_out.xml
500ms かけて左側へスライドして出ていきます。
<?xml version="1.0" encoding="utf-8"?>
<set
  xmlns:android="http://schemas.android.com/apk/res/android">
  <translate
    android:fromXDelta="0"
    android:toXDelta="-100%p"
    android:duration="500"/>
</set>
right_in.xml
500ms かけて右側から入ってきます。
<?xml version="1.0" encoding="utf-8"?>
<set
  xmlns:android="http://schemas.android.com/apk/res/android">
  <translate
    android:fromXDelta="100%p"
    android:toXDelta="0"
    android:duration="500"/>
</set>
right_out.xml
500ms かけて右側に出ていきます。
<?xml version="1.0" encoding="utf-8"?>
<set
  xmlns:android="http://schemas.android.com/apk/res/android">
  <translate
    android:fromXDelta="0"
    android:toXDelta="100%p"
    android:duration="500"/>
</set>
res/layout/main.xml は次のとおりです。この中で、 ViewFlipper に LinearLayout を二つ含めていることに注意してください。 そして、それぞれの LinearLayout のなかでは TextView で文字を表示し、その下にボタンを配置しています。
<?xml version="1.0" encoding="utf-8"?>
<ViewFlipper
  xmlns:android="http://schemas.android.com/apk/res/android"
  android:id="@+id/flipper"
  android:orientation="vertical"
    android:layout_width="fill_parent"
    android:layout_height="fill_parent">
<LinearLayout
  xmlns:android="http://schemas.android.com/apk/res/android"
    android:orientation="vertical"
    android:layout_height="match_parent"
    android:layout_width="match_parent">
<TextView
    android:layout_width="match_parent"
    android:layout_height="wrap_content"
    android:text="Hello!"
    android:textSize="30sp"
    />
<Button
  android:id="@+id/next_button"
  android:layout_width="match_parent"
  android:layout_height="wrap_content"
  android:text="Next"/>
</LinearLayout>
<LinearLayout
  xmlns:android="http://schemas.android.com/apk/res/android"
    android:orientation="vertical"
    android:layout_width="match_parent"
    android:layout_height="match_parent"
    >
<TextView
    android:layout_width="match_parent"
    android:layout_height="wrap_content"
    android:text="World!"
    android:textSize="30sp"
    />
<Button
  android:id="@+id/back_button"
  android:layout_width="match_parent"
  android:layout_height="wrap_content"
  android:text="Back"/>
</LinearLayout>
</ViewFlipper>
以上のリソースを作成した上で、次のようにします。
package com.keicode.android.test;

import android.app.Activity;
import android.os.Bundle;
import android.view.View;
import android.view.View.OnClickListener;
import android.view.animation.AccelerateInterpolator;
import android.view.animation.Animation;
import android.view.animation.AnimationUtils;
import android.view.animation.TranslateAnimation;
import android.widget.Button;
import android.widget.ViewFlipper;

public class ViewFlipperTest1 extends Activity
    implements OnClickListener {

  ViewFlipper viewFlipper;
  Button nextButton;
  Button backButton;

  Animation inFromRightAnimation;
  Animation inFromLeftAnimation;
  Animation outToRightAnimation;
  Animation outToLeftAnimation;

  @Override
    public void onCreate(Bundle savedInstanceState) {
        super.onCreate(savedInstanceState);
        setContentView(R.layout.main);

        findViews();
        setListeners();
        setAnimations();
    }

  protected void findViews(){
    nextButton = (Button)findViewById(R.id.next_button);
    backButton = (Button)findViewById(R.id.back_button);
    viewFlipper = (ViewFlipper)findViewById(R.id.flipper);
  }

  protected void setListeners(){
    nextButton.setOnClickListener(this);
    backButton.setOnClickListener(this);
  }

  protected void setAnimations(){
    inFromRightAnimation =
      AnimationUtils.loadAnimation(this, R.anim.right_in);
    inFromLeftAnimation =
      AnimationUtils.loadAnimation(this, R.anim.left_in);
    outToRightAnimation =
      AnimationUtils.loadAnimation(this, R.anim.right_out);
    outToLeftAnimation =
      AnimationUtils.loadAnimation(this, R.anim.left_out);
  }

  @Override
  public void onClick(View v) {
    switch(v.getId()){
    case R.id.next_button:
      viewFlipper.setInAnimation(inFromRightAnimation);
      viewFlipper.setOutAnimation(outToLeftAnimation);
      viewFlipper.showNext();
      break;
    case R.id.back_button:
      viewFlipper.setInAnimation(inFromLeftAnimation);
      viewFlipper.setOutAnimation(outToRightAnimation);
      viewFlipper.showPrevious();
      break;
    }

  }

}
ポイントはまず、アニメーションを AnimationUtils.loadAnimation で取得している点です。 アニメーションリソースから Animation オブジェクトを取得するには、このメソッドを用いると便利です。
ここではボタンのクリックイベントリスナーはこのアクティビティ自身に設定しています。onClickメソッドにて、クリックされたボタンを判別して、アニメーションの設定をしています。
ViewFlipper の setInAnimation、setOutAnimation で入ってくる View、出て行く View に対するアニメーションの設定を行います。
最初の画面から切り替え後の画面に行くときは showNext メソッドを、 切り替え後の画面から元の画面に戻るときは showPrevious メソッドを呼びます。
ちなみに、ここでは ViewFlipper の子要素が LinearLayout 二つだけだったので、「元の画面」「次の画面」を showNext, showPrevious で行ったり来たりしていましたが、 ViewFlipper の子要素が3個以上でも構いません。そのときは showNext は次の要素へ、 showPrevious は前の子要素へ移動と考えます。
コードによるアニメーションの設定
では同じことを、アニメーションリソースを用いないで行ってみます。
状況に応じてアニメーション効果を微妙に変化させる場合等は、リソースファイルで設定することが難しい場合もあり、その場合はコードでアニメーション効果を作ることを検討すると良いでしょう。
プログラムの全体的な構成は同様ですので、変更点だけ記述します。
  ...
  protected void setAnimations(){
    inFromRightAnimation = getInFromRightAnimation();
    inFromLeftAnimation = getInFromLeftAnimation();
    outToLeftAnimation = getOutToLeftAnimation();
    outToRightAnimation = getOutToRightAnimation();
  }

  ...

  private Animation getInFromRightAnimation() {
    Animation anim = new TranslateAnimation(
      Animation.RELATIVE_TO_PARENT, 1.0f,
      Animation.RELATIVE_TO_PARENT, 0.0f,
      Animation.RELATIVE_TO_PARENT, 0.0f,
      Animation.RELATIVE_TO_PARENT, 0.0f);
    anim.setDuration(500);
    anim.setInterpolator(new AccelerateInterpolator());
    return anim;
  }

  private Animation getOutToLeftAnimation() {
    Animation anim = new TranslateAnimation(
      Animation.RELATIVE_TO_PARENT, 0.0f,
      Animation.RELATIVE_TO_PARENT, -1.0f,
      Animation.RELATIVE_TO_PARENT, 0.0f,
      Animation.RELATIVE_TO_PARENT, 0.0f);
    anim.setDuration(500);
    anim.setInterpolator(new AccelerateInterpolator());
    return anim;
  }

  private Animation getInFromLeftAnimation() {
    Animation anim = new TranslateAnimation(
      Animation.RELATIVE_TO_PARENT, -1.0f,
      Animation.RELATIVE_TO_PARENT, 0.0f,
      Animation.RELATIVE_TO_PARENT, 0.0f,
      Animation.RELATIVE_TO_PARENT, 0.0f);
    anim.setDuration(500);
    anim.setInterpolator(new AccelerateInterpolator());
    return anim;
  }

  private Animation getOutToRightAnimation() {
    Animation anim = new TranslateAnimation(
      Animation.RELATIVE_TO_PARENT, 0.0f,
      Animation.RELATIVE_TO_PARENT, 1.0f,
      Animation.RELATIVE_TO_PARENT, 0.0f,
      Animation.RELATIVE_TO_PARENT, 0.0f);
    anim.setDuration(500);
    anim.setInterpolator(new AccelerateInterpolator());
    return anim;
  }

}
変更があるのは setAnimations メソッド内のみです。それに加え、四つのアニメーション定義用のメソッドを追加しています。
 | 【関連記事】 この記事を読んだ方は、こちらも気に入るはずです。 |