アラートダイアログ (AlertDialog) の使い方
アンドロイドで、ポップアップメッセージとか、アラートメッセージを表示する一番簡単な方法は恐らく AlertDialog (アラートダイアログ) を利用する方法でしょう。
アラートダイアログは簡単に使えるのですが、状況に応じて簡単な選択項目を表示できる等、なかなか多機能です。
ここではアラートダイアログを利用する5パターンについて説明します。
AlertDialog とは
AlertDialog は基本的に1個から3個までのボタンを表示して、ユーザーから簡単な入力を促すために使えます。
その他、次のように複数選択または単一選択の選択項目を表示することもできます。
その他、中身を完全にカスタムに入れ替えてしまうこともできます。
このスクリーンショットの例では、テキストボックス (EditText) をひとつ表示して、ユーザーに入力を促しています。
それでは、サンプルプログラムを作りながらこれらの作り方を紹介します。
AlertDialog を利用するサンプルプログラム
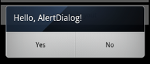
 ここで作るサンプルプログラムは左のスクリーンショットのようなものです。
ボタンが5個並んでいて、id が button1 から button5 まで割り当ててあります。 それぞれのボタンをおすと、次に説明するような様々な AlertDialog が表示されます。
ボタンを配置する方法、クリックに応答する方法はここでは詳しく説明しませんので、よく分からないという人は、 リニアレイアウト、クリックリスナー についての説明を見ておいてください。
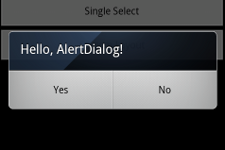
基本的な、ボタンのみの AlertDialog
まずはもっとも単純なボタン (とメッセージ) を表示するだけの AlertDialog です。
package com.keicode.android.test;

import android.app.Activity;
import android.app.AlertDialog;
import android.content.DialogInterface;
import android.os.Bundle;
import android.util.Log;
import android.view.LayoutInflater;
import android.view.View;
import android.view.View.OnClickListener;
import android.widget.Button;
import android.widget.EditText;

public class DialogTest1Activity extends Activity {

  final String TAG = "DialogTest";

  @Override
  protected void onCreate(Bundle savedInstanceState) {
    super.onCreate(savedInstanceState);
    setContentView(R.layout.main);

    ((Button)findViewById(R.id.button1))
    .setOnClickListener(new OnClickListener(){
      @Override
      public void onClick(View v) {
        new AlertDialog.Builder(DialogTest1Activity.this)
        .setTitle("Hello, AlertDialog!")
        .setPositiveButton(
          "Yes",
          new DialogInterface.OnClickListener() {
            @Override
            public void onClick(DialogInterface dialog, int which) {
            }
          })
        .setNegativeButton(
          "No",
          new DialogInterface.OnClickListener() {
            @Override
            public void onClick(DialogInterface dialog, int which) {
            }
        })
        .show();
      }
    });
    ...
ここでは Activity の onCreate でボタンをとってきて、OnClickListener の設定、およびその中での AlertDialog の作成まで一気にやってます。 以下のサンプルもそうなってます。
なので、AlertDialog の表示部分にフォーカスすると、次の部分だけになります。
        new AlertDialog.Builder(DialogTest1Activity.this)
        .setTitle("Hello, AlertDialog!")
        .setPositiveButton(
          "Yes",
          new DialogInterface.OnClickListener() {
            @Override
            public void onClick(DialogInterface dialog, int which) {
            }
          })
        .setNegativeButton(
          "No",
          new DialogInterface.OnClickListener() {
            @Override
            public void onClick(DialogInterface dialog, int which) {
            }
        })
        .show();
AlertDialog.Builder で AlertDialog を作っています。まずはビルダーオブジェクトを作って、それから create か show で AlertDialog を作ります。
setTitle でダイアログのタイトルを設定しています。
Yes/No ボタンをそれぞれ setPositiveButton、setNegativeButton で作っています。ポジティブの方は "肯定的な (positive) 答え" に、 ネガティブは "否定的な (negative) 答え" に使えば良いでしょう。
ちなみにこのページでは扱っていませんが、この他にニュートラルボタンという三つ目のボタンも作れます。
最後に show() で AlertDialog.Builder から AlertDialog を作って表示しています。
show メソッドで AlertDialog の作成と表示を一度にやらずに、 create メソッドで AlertDialog を作成してから、AlertDialog の show() メソッドで表示しても OK です。
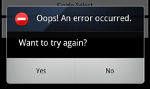
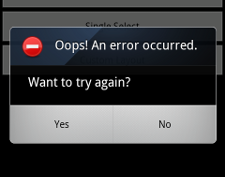
アイコン付きの AlertDialog。警告やエラーに便利
次はアイコン付きの AlertDialog です。タイトルの他にメッセージも表示しています。
コードは次のとおりです。
        new AlertDialog.Builder(DialogTest1Activity.this)
        .setTitle("Oops! An error occurred.")
        .setMessage("Want to try again?")
        .setIcon(R.drawable.error)
        .setPositiveButton(
          "Yes",
          new DialogInterface.OnClickListener() {
            @Override
            public void onClick(
              DialogInterface dialog, int which) {
            }
          })
        .setNegativeButton("No", null)
        .show();
アイコンは setIcon メソッドで設定しています。
 Drawable を指定していますが、このエラーアイコン (error.png) を
リソースディレクトリ (res) の下に drawable という名前のディレクトリを作ってそこにアイコンをおくだけで OK です。
Drawable を指定していますが、このエラーアイコン (error.png) を
リソースディレクトリ (res) の下に drawable という名前のディレクトリを作ってそこにアイコンをおくだけで OK です。
ちなみにこのエラーアイコン、拾ってきたのですが Public Domain だそうですのでご自由にお使いください。
メッセージは setMessage メソッドで設定します。非常に直感的にわかって良い感じですよね。
それから、ここではネガティブボタンの方にはリスナーのパラメータとして null を渡しています。ボタンをおすとダイアログは自動的に消えます (dismiss) ので、 特別な処理を必要としない限りこんなんでも OK です。
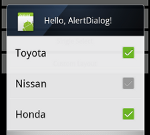
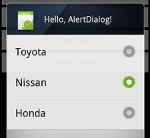
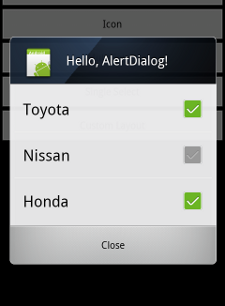
複数選択、単一選択の入力項目を持つ AlertDialog
少しずつ機能が増えてきます。
まずは複数選択のオプションを表示する AlertDialog はこのようになります。
単一選択は次のとおり。
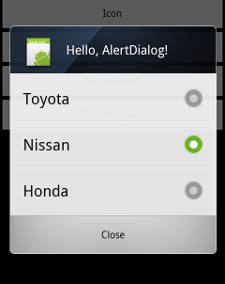
コードは似通っているので一度に見てみましょう。
複数選択は setMultiChoiceItems メソッドで設定します。
    final CharSequence[] items = { "Toyota", "Nissan", "Honda" };
    final boolean[] itemsChecked = new boolean[items.length];

    ...

        new AlertDialog.Builder(DialogTest1Activity.this)
        .setTitle("Hello, AlertDialog!")
        .setIcon(R.drawable.icon)
        .setMultiChoiceItems(
          items,
          itemsChecked,
          new DialogInterface.OnMultiChoiceClickListener() {
            @Override
            public void onClick(
              DialogInterface dialog,
              int which,
              boolean isChecked) {

              Log.d(TAG, items[which] + " Checked");

            }
          })
        .setPositiveButton(
          "Close",
          new DialogInterface.OnClickListener() {
            @Override
            public void onClick(
              DialogInterface dialog,
              int which) {
              Log.d(TAG,
                itemsChecked[0]
                 + " - " + itemsChecked[1]
                 + " - " + itemsChecked[2]);
            }
          })
        .show();
単一選択は setSingleChoiceItems で設定します。
        new AlertDialog.Builder(DialogTest1Activity.this)
        .setTitle("Hello, AlertDialog!")
        .setIcon(R.drawable.icon)
        .setSingleChoiceItems(
          items,
          0, // Initial
          new DialogInterface.OnClickListener() {
            @Override
            public void onClick(
              DialogInterface dialog,
              int which) {
              Log.d(TAG, items[which] + " Selected");

            }
          })
        .setPositiveButton("Close", null)
        .show();
選択項目のクリックイベントは、項目を操作する度に発生します。
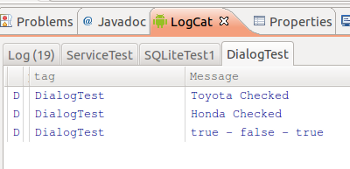
上のコードを実行すると、チェックボックスをおすたびに DialogInterface.OnClickListener の onClick が実行されます。そして、 最後にボタンをおしたときにも、その選択項目を取得しようと思えば取得できます。
(が、Android では最後の OK ボタンで変更をすべて反映するのではなく、チェックを変えた時点で設定値が変わるという動作の方が一般的のようですね)
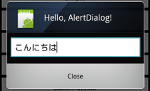
自由度が非常に高いカスタムレイアウトの AlertDialog
項目の選択だけではなく何かの入力を促したりといった、任意の操作をしたい場合は Dialog クラスを利用するのもテですが、 AlertDialog にレイアウトを組み合わせて利用することもできます。
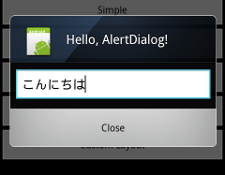
これを実現する方法は次のとおりです。
まずはレイアウトリソースを作ります。次の内容を res/layout/dialog5.xml として保存します。
<?xml version="1.0" encoding="utf-8"?>
<LinearLayout
	xmlns:android="http://schemas.android.com/apk/res/android"
	android:orientation="vertical"
	android:layout_width="fill_parent"
	android:layout_height="fill_parent">
	<EditText
		android:id="@+id/editText1"
		android:layout_width="fill_parent"
		android:layout_height="wrap_content"/>
</LinearLayout>
dialog5.xml というファイル名は任意ですが、場所は res/layout におきます。
そこで Layout Inflater を使って次のようにします。
LayoutInflater inflater
= LayoutInflater.from(DialogTest1Activity.this);
View view = inflater.inflate(R.layout.dialog5, null);
final EditText editText
= (EditText)view.findViewById(R.id.editText1);
new AlertDialog.Builder(DialogTest1Activity.this)
.setTitle("Hello, AlertDialog!")
.setIcon(R.drawable.icon)
.setView(view)
.setPositiveButton(
"Close",
new DialogInterface.OnClickListener() {
@Override
public void onClick(DialogInterface dialog, int which) {
Log.d(TAG,
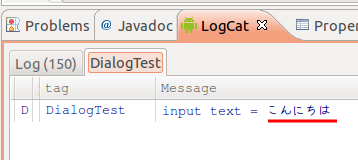
"input text = " + editText.getText().toString());
}
})
.show();
ここでは onClick 内でデバッグログを出力していますが、確かに次のように入力内容が取得できていることが分かります。