パッケージマネージャを用いて、インストールされているプログラムの一覧を取得する
昨今の調査は Android 端末のビジネスシーンでの普及を狙うには、 BYOD 問題を解決することが大変重要であることを示しています。
そのときに、端末にインストールされているアプリケーションを調べることが必要とされるでしょう。
端末にインストールされているアプリケーション・パッケージの情報を調べるために、パッケージマネージャが利用できます。
ここではパッケージマネージャを利用して、現在インストールされているアプリケーションを調べる方法を示します。
インストールされているアプリケーション一覧を取得する方法
ここで作るプログラムは次のようなものです。
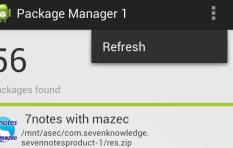
プログラムを起動すると、次のようにアプリケーションの一覧を表示します。

おまけとして、一応更新 (Refresh) ボタンがあって、それを押すとリストを最新に更新します。
まず準備として、ここのエントリーの情報を保持するクラスを定義しておきましょう。
package com.example.pkgmgr1;

import java.sql.Timestamp;
import java.text.DateFormat;
import java.util.Calendar;
import java.util.Date;

import android.graphics.drawable.Drawable;

public class MyAppInfo {
  String sourceDir;
  String label;
  Drawable drawable;

  public MyAppInfo(
    String sourceDir,
    String label,
    Drawable drawable){
    this.sourceDir = sourceDir;
    this.label = label;
    this.drawable = drawable;
  }

  public String getSourceDir(){
    return this.sourceDir;
  }

  public String getLabel(){
    return this.label;
  }

  public Drawable getDrawable(){
    return this.drawable;
  }
}
このクラスのコンパレータも作っておきます。
package com.example.pkgmgr1;

import java.util.Comparator;

public class MyAppInfoComparator
	implements Comparator<MyAppInfo> {
  @Override
  public int compare(MyAppInfo i1, MyAppInfo i2) {
    return i1.getLabel().compareTo(i2.getLabel());
  }
}
こうしたコンパレータはリストなどのコレクション内の要素を並べ替えるために使うのですが、それについては Java 入門の 「ArrayList 要素のソートと Comparator」などを参考にしてください。
さらにレイアウトはこんな風にリストビューとテキストビューを並べておきます。
<?xml version="1.0" encoding="utf-8"?>
<LinearLayout
  xmlns:android="http://schemas.android.com/apk/res/android"
  android:orientation="vertical"
  android:layout_width="fill_parent"
  android:layout_height="fill_parent"
  >
  <TextView
      android:textSize="48sp"
      android:layout_marginTop="10dp"
      android:layout_marginLeft="10dp"
      android:layout_marginBottom="2dp"
      android:id="@+id/countTextView"
      android:layout_width="match_parent"
      android:layout_height="wrap_content"/>
  <TextView
      android:layout_width="match_parent"
      android:layout_height="wrap_content"
      android:text="@string/appcount_label"
      android:textColor="#999999"
      android:layout_marginLeft="10dp"
      android:layout_marginBottom="10dp"/>
  <View
      android:layout_height="5dp"
      android:layout_width="match_parent"
      android:background="#A4C739"/>
  <ListView
    android:layout_height="0dip"
    android:id="@+id/listView1"
    android:layout_width="match_parent"
    android:layout_weight="1"/>
</LinearLayout>
行ごとのレイアウトはこちら。
<?xml version="1.0" encoding="utf-8"?>
<LinearLayout
  xmlns:android="http://schemas.android.com/apk/res/android"
  android:orientation="horizontal"
  android:layout_width="match_parent"
  android:layout_height="match_parent"
  android:padding="5dip">
  <ImageView
    android:contentDescription=""
    android:id="@+id/imageView1"
    android:layout_width="40dp"
    android:layout_height="40dp"
    android:layout_gravity="center_vertical"
    android:layout_margin="5dip"/>
  <LinearLayout
    android:orientation="vertical"
    android:layout_width="match_parent"
    android:layout_height="wrap_content">
    <TextView
      android:textSize="18sp"
      android:id="@+id/textView1"
      android:layout_height="wrap_content"
      android:layout_width="match_parent"
      android:layout_gravity="center_vertical"
      android:layout_marginLeft="5dip"/>
    <TextView
      android:textSize="12sp"
      android:id="@+id/textView2"
      android:layout_height="wrap_content"
      android:layout_width="match_parent"/>
  </LinearLayout>
</LinearLayout>
リストビューにおいて、行の内容をカスタマイズするという話については「ListView の利用方法」をみてください。
さて、上記が準備でパッケージマネージャを用いて、インストールされているアプリケーションの一覧を取得するコードはこちらです。
package com.example.pkgmgr1;

import java.util.ArrayList;
import java.util.Collections;
import java.util.List;

import android.os.Bundle;
import android.app.Activity;
import android.content.Context;
import android.content.pm.ApplicationInfo;
import android.content.pm.PackageInfo;
import android.content.pm.PackageManager;
import android.graphics.drawable.Drawable;
import android.view.LayoutInflater;
import android.view.Menu;
import android.view.MenuItem;
import android.view.View;
import android.view.ViewGroup;
import android.widget.BaseAdapter;
import android.widget.ImageView;
import android.widget.ListView;
import android.widget.TextView;

public class MainActivity extends Activity {

  PackageManager pm = null;

  ListView listView1;
  TextView countTextView;
  static List<MyAppInfo> dataList = new ArrayList<MyAppInfo>();
  static PackageListAdapter adapter = null;

  @Override
  protected void onCreate(Bundle savedInstanceState) {
    super.onCreate(savedInstanceState);
    setContentView(R.layout.activity_main);

    pm = getApplicationContext().getPackageManager();

    listView1 = (ListView) findViewById(R.id.listView1);
    countTextView = (TextView)findViewById(R.id.countTextView);

    adapter = new PackageListAdapter();
    listView1.setAdapter(adapter);

    updatePackageList();
  }


  @Override
  public boolean onCreateOptionsMenu(Menu menu) {
    getMenuInflater().inflate(R.menu.main, menu);
    return true;
  }


  @Override
  public boolean onOptionsItemSelected(MenuItem item) {
    switch(item.getItemId()){
    case R.id.refresh1:
      updatePackageList();
      return true;
    }
    return false;
  }


  protected void updatePackageList(){

    dataList.clear();

    List<PackageInfo> pkgInfoList = pm.getInstalledPackages(0);

    for(PackageInfo pkgInfo : pkgInfoList){
      ApplicationInfo appInfo = pkgInfo.applicationInfo;
      String sourceDir = appInfo.publicSourceDir;
      if(!sourceDir.startsWith("/system/")){
        String label = appInfo.loadLabel(pm).toString();
        Drawable drawable = appInfo.loadIcon(pm);
        dataList.add(new MyAppInfo(sourceDir, label, drawable));
      }
    }

    Collections.sort(dataList, new MyAppInfoComparator());

    countTextView.setText(dataList.size() + "");
    adapter.notifyDataSetChanged();
  }


  private class PackageListAdapter extends BaseAdapter {

    @Override
    public int getCount() {
      return dataList.size();
    }

    @Override
    public Object getItem(int position) {
      return dataList.get(position);
    }

    @Override
    public long getItemId(int position) {
      return position;
    }

    @Override
    public View getView(
      int position,
      View convertView,
      ViewGroup parent) {

      View v = convertView;
      TextView textView1;
      TextView textView2;
      ImageView imageView1;

      if(v==null){
        LayoutInflater inflater =
        (LayoutInflater) getSystemService(
        	Context.LAYOUT_INFLATER_SERVICE);
        v = inflater.inflate(R.layout.row, null);
      }

      MyAppInfo aInfo = (MyAppInfo)getItem(position);
      if(aInfo != null){
        textView1 = (TextView) v.findViewById(R.id.textView1);
        textView2 = (TextView) v.findViewById(R.id.textView2);
        imageView1 = (ImageView) v.findViewById(R.id.imageView1);

        textView1.setText(aInfo.getLabel());
        textView2.setText(aInfo.getSourceDir());
        imageView1.setImageDrawable(aInfo.getDrawable());
      }
      return v;
    }

  }
}
ここでは updatePackageList メソッド内で getInstalledPackages メソッドを用いてパッケージのリストを取得しています。 そのリスト内から PackageInfo を取得して、そこから ApplicationInfo を取得。表示に必要なラベル情報、パス情報、アイコン情報などを取得しています。
実は getInstalledApplications というメソッドもあり、PackageInfo を介せず直接 ApplicationInfo も取れるのですが、 PackageInfo から ApplicationInfo は直接取得できるのですが、ApplicationInfo から PackageInfo は直接取れないようなので、 ここでは今後やろうと思えばたくさん情報が取れそうなパッケージリストを先に取得してみました。
ApplicationInfo の属性 publicSourceDir はパッケージが利用可能なソースディレクトリを示します。この値が "/system/" 以下であるものは、 Android システムそのもので必要とされる(あるいはキャリアが構成後配布した)ものであると考えられるので、あまり興味はない場合が多いと思うので、 ここではそのパス名が "/system/" 始まりかどうかでフィルターをかけています。
それから、メニューリソースはこちら。
<menu
  xmlns:android="http://schemas.android.com/apk/res/android" >
    <item
        android:id="@+id/refresh1"
        android:orderInCategory="100"
        android:showAsAction="never"
        android:title="@string/action_refresh"/>
</menu>
onCreateOptionsMenu でメニューを作り、onOptionsItemSelected でリストを更新するだけです。